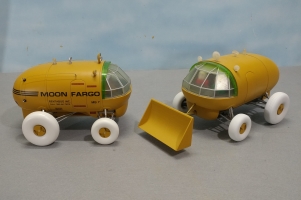

I ordered all the 3d printed parts from either Shapeways or I.materialise.
The main body of the bug is printed in sintered nylon. This is known as versatile plastic on Shapeways, and polymide on I.materialise.
This material can be made smooth with filler primer and sanding. It takes about five or six coats.
For smaller parts, or ones with fine detail, I used various printed resins. I used standard resin and gray resin from I.materialise, and fine detail plastic from Shapeways.
The sun visor was made from 0.5mm clear plastic sheet (PETG). The hubs, tyres and small detail pieces were printed in fine detail plastic.
The window section was printed in standard resin. Using an airbrush, I gave both sides of the part, a couple of coats of pledge floor gloss. This made the windows a bit more transparent.


As a test, I got some suspension parts printed in polymide and some in gray resin. The resin parts just needed a light sanding and they were ready for primer and paint.
The polymide parts needed a bit more work. A few coats of filler primer and sanding, and the parts looked fine. Polymide is a lot tougher than resin, and cheaper, so I decided to use this for all the other suspension parts.
Springs and brass tubes were used to finish off the suspension. I later replaced the brass with aluminium tubes.

The shovel was printed in polymide. The shovel arm was made from soldered brass tube and brass strip.
I could see more through the windows than I thought I would be able to. So I printed a basic dashboard and tried putting in some revell gemini figures. They looked fine, but were too large for the scale of the model. I decided not to use them, as I could always print more accurate figures later. To tint the visor green I used self adhesive plastic sheet, stuck on the inside of the curve.


For the text and signs on the models, I made some graphics in microsoft paint, then printed them on clear inkjet decal paper.
In my tests, I was happy with the signs, but didn't like the raised clear film between the black letters. I ordered a custom A4 sheet of dry transfers from 4D models. This wasn't cheap, but the text was very easy to apply and gave great results.
For the colour of the bugs, I felt the filler primer was a good match. I gave the model a coat of Halfords matt lacquer before applying the decals and transfers. To seal everything, I gave it several more coats of matt lacquer.
The matt lacquer made the colour look more saturated, and actually less matt. In the picture below of the larger models, the finished bug on the left has a total of four coats of lacquer, the one on the right has none.


The black stripes were done with car pinstripe tape. The aerials or whatever they are meant to be, were made with aluminium tube and 0.5mm brass rod.
The moon bug is basically finished, it just needs a few more signs added. The bugdozer needs a little more work.


You can email me at tobor@btinternet.com